Projects and Tricks for Metalsmiths
In this section you can find a number of short how-to instructions that both novice and experienced metalsmiths may find to be useful and interesting.
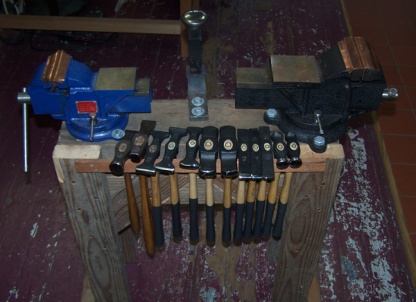
Tool Organizing Blocks
This is a rather simple project, but so many people ask me where I get my tool organizing blocks that I am writing instructions on how to make them. This is a pretty quick project, and since much of the effort is setting up to do the work, it makes sense to make more than one. Plus these blocks make a great gift for other metalsmiths.
Tools and materials: The wood used in this project could be almost anything, but I like to use scraps of smooth grained hardwood like walnut, maple, and mahogany. I usually get scraps from friends who do woodwork, but woodworking supply shops will often have a discount bin with cut off ends, and sometimes they will be willing to cut your purchase to length. Anyway around it, look for wood that is about half as thick as the tools you wish to hold are long. In the example here the tools are 4” long, so I used wood that is 2” thick.
The tools you will need are simple, they include a ruler, and a pencil, a little medium sandpaper, a small hand plane, and a drill. I use a small drill press to be sure that the holes run straight down into the block. Your drill bit should be just slightly larger than the shaft of the tools you want your block to hold. Here I have 1/4” diameter tools, and the next size in my drill set is 3/8” which is too big, so I got a 7.5mm bit, which works very well.
Layout and drilling: Once you have your block of wood and tools, lay out a grid on the top of the block to position the drill holes. Make the lines on your grid at least twice as far apart as the thickness of the tool shafts, and not so close together that you cannot get your finger in to grasp a tool. So for my 1/4” tools I spaced my lines at 1/2” apart, which is just wide enough for my fingers. The intersections will be the center marks for drilling.
Before you begin to make holes, you need to mark the depth if you are using a hand held drill, or set the depth stop if you are using a drill press. That way you will not bore right through the bottom of the block. You can mark the depth by simply wrapping a little tape around the drill bit at the depth required, then just drill down to the tape and stop. Bore the holes as close to vertically as you can, taking care to accurately position each hole on the grid.
Finish work: Once you have all the holes cut to the proper depth, bevel the upper edges of the block, to prevent the chance of getting splinters from the edges later. A small hand plane makes short work of this, but pay attention to the grain of the wood so that it does not chip out, or cause the plain to dive into the wood. Now sand the block smooth, taking care to remove any splintering around the drill holes. If you wish, you can apply wood finish, though I do not find that I need to.
Making the Two Inch Mini-Trivet

Small trivets for enamellists are sometimes hard to find, and often of poor quality, even in larger sizes. But there is no reason to spend a lot of money, and waist time looking for a place that will sell you trivets that may or may not be the size you need. Most hobby shops and good quality hardware stores will sell small amounts of stainless steel sheet and fasteners from which you can make the trivets you need in the exact size and configuration you need. This sheet can usually be found on what is called the K&S rack which will have all sorts of bar stock, tubing, channel, and sheet in brass, copper, aluminum, and stainless. The fasteners can usually be found in bins in the back with enough looking around, but sometimes I just ask where they are kept and save a bunch of time. So here are my instructions for making four 2” trivets from 22 or 24 ga. stainless sheet and #4 by 40 stainless nuts and machine screws.
First the materials: You will need two strips of 22 ga(.025″) or 24 ga(.020″) sheet, one 12” by 1”, and one 12” by ½”. These are both common K&S items, but if one of the sizes in not available you can buy a larger piece and cut it to size. You will also need 24 machine screws and nuts that fit them. I usually get a few extra in case I lose some. They must all be solid stainless steel, not plated, and not the nuts with the little plastic keeper inserts.
The tools for this project are simple, and some may be substituted for. These include a screwdriver to fit your machine screws, whatever head pattern you have been able to get, and a little wrench or socket to fit the nuts. An artist’s scriber and machinist’s square and ruler will serve well for layout, however a good combination square can take the place of all of these. You will want a fine tooth file to remove the burr left by shearing the metal, and a smooth hammer and block to flatten any distortion in the cut parts and a hammer suitable to drive a center punch. If you have access to a lapidary grinder or de-burring fiber-wheels you can save a bunch of time on the de-burring. You will need a shear, which can be a good pair of tin snips, or aviation shears. The tin snips will leave a cleaner cut, but require more strength to use, while the aviation shears have a compound action, but leave a serrated edge on the metal. If you decide to use a throatless shear like a Beverly or a Pexto, or a bench shear, then be sure to set the blade clearance, for thin hard metal. To make the boltholes I use a Whitney punch, which saves a bunch of time, but you can also drill the holes if you don’t have a punch. If you are to be drilling your holes, I strongly recommend clamping the metal to a bit of wood while drilling, if you wish to keep your fingers that is. This can be done with all sorts of clamps even a bench vice, but it helps to have a few scraps of hardwood to help hold the metal without distorting it. I also favor a parallel jaw pliers for bending and straightening the sheet metal.
Layout:The more precisely you layout and cut your parts, the easier it will be for you when it comes time to assemble your trivets, and the better they will work when handling very small enamels. Remember to remove any protective plastic coating from the strips of metal before you start your layout. The first line you will scribe is simple, divide the 12” by ½” strip in half lengthwise by running a mark right down the middle. Next mark with your square across this strip at 1” intervals, making every other line dashed, as on the diagram below. These are the only markings you will make on this piece. On the 12” by 1” strip mark with your square across the middle, perpendicular to the length of the metal. Now make four more such marks at 2” intervals so as to layout the strip to cut into sixths. Each of these pieces will make two of the trivet blades. Now mark transverse lines at ½” from the ends, and ½” on either side of the five lines you have already marked, this time make them dashed lines, as these are not lines that are to be cut. With the machinist’s ruler or the 45-degree rail on the combination square make diagonal marks connecting the dashed lines. These will be the slanting blade edges that hold the enamels. Now mark lines that run parallel to the strip of steel ¼” in from each edge, and that connect the dashed lines where the diagonal lines do not. Mark these lines on the ends of the strip as well. This is probably starting to sound complicated, but it is not too bad when you look closely at the diagram. You now have only one more set of lines to strike. These run across the metal, parallel to your dashed lines, at a distance of ¼”, halfway between the dashed lines and your cut lines. Now you will make a mark with the center punch in the corner where these lines you have just struck come together on the side that is to be the outside of the trivet blade. Mark it very precisely at 1/16” from lines. The hole you will make here will keep your trivet from cracking in use. Now strike the center marks for the boltholes. Make them 1/8” from the dashed line, precisely between it and the nearest cut line. You should mark one on each side of the blade ¼” from the edge on the outer, and ½” on the inner. With care check your layout against the diagram I have provided. Make any and all corrections before you start to cut.
Cutting:It is important to have good light when you are cutting the steel, as your layout is only as good as your cut. I like to have a lamp quite close, and one with which I can adjust the angle of the light. I usually start with punching or drilling the holes in the strip. As I mentioned I favor a Whitney punch whenever possible. It cuts a cleaner hole, requires no clamping, is faster, and is far safer. If you don’t have one clamp the strip between wooden blocks, near where you are to drill. If you have a drill press use it to help control the process. In either case you will be making 1/8” holes, so select the proper size punch dies or drill bit. Now to the shear! After each cut flatten the parts between the hammer and block, as this makes it easier to control the cuts that are to follow. If your shear is leaving an excessive burr it is not adjusted for the thickness of your metal, or it is in need of sharpening. You will save yourself a lot of trouble by using a sharp well-adjusted shear. With a bench shear or throatless a drop of oil on the blades will help give a clean cut. Start by cutting the 12” by 1” strip into sixths along the lines you struck first. Now cut just up to the edge of the corner hole at the bottom of each piece, from both directions, and pop out the little piece of waste metal. Flatten the metal you have just cut. Next cut the diagonal lines, and flatten the blades again. Now cut the 12” by ½” strip lengthwise down the center line to make two strips that measure 12” by ¼”. Now cut each of these on every other perpendicular line so as to make pieces that measure 2” by ¼”. Flatten these and set up to remove the burrs on all the parts.
Deburring: To save time I use a lapidary grinder with 120 and 220 grit for the bulk of the burr removal, and for beveling the edges of the trivet blades. However I still use files for getting into the corners and for truing parts that didn’t layout quite right. In any event files offer more control. Whichever you use, remove all burrs on your parts carefully, and then file or grind a sharp bevel on the diagonal edge of each blade.
Assembly: This is the tricky part. First set out three blades, three of the little strips, six bolts (machine screws), and six nuts. These are the parts you will need to make your first trivet. Start by bending each of your little 2” by ¼” pieces on the dashed transverse line to 60 degrees as shown in the illustration. I like to use parallel jaw pliers for this, but any method that results in a clean bend will work well. Check your angles by placing three of the strips on edge on your bench block with the bends together in the middle of the pattern. They should all touch along the length of all the pieces. If they do not, adjust the angles so that they do. Now you can see where the blades will bolt between the strips. Now place one of the legs of one of the strips on one of the trivet blades, positioned along the lower edge of the blade over the boltholes, such that the bend in the strip is just visible beyond the inner edge of the blade. Take the time to get this position right, and then clamp it. Now use one of the holes in the blade as a guide for making a hole in the strip. Once this hole is made secure the parts with a bolt and nut. Next, check the position again, and make a second hole. Now make some sort of witness marks that will tell you that this strip goes on this side of this blade, and remove the bolts. Repeat this process with another strip on the other side of the same blade. When all the holes are cut, bolt both strips onto this first blade. Now you can align the second and third blades, and cut the remaining holes in the strips. Once these holes are cut, test the fit by bolting on the blades, and placing the assemblage on your bench block to see how it will stand in the kiln. At this point the only holes left to cut are those in the third strip, but you will see that alignment becomes tricky at this stage. After making more witness marks, unbolt the second and third blades. Now align the third strip with the unmarked side of one of the blades and cut the boltholes as with the first blade. Again apply witness marks to match up the third strip with this blade. Now bolt both the blade and the third strip to the first blade and the other strips, leaving out only the third blade. Now you can use the holes in the first strip to guide your cutting of the final two holes. Bolt the final blade into place, and check how the parts fit together and how the trivet stands on the bench block or table. You may need to make minor adjustments with a file to get the parts fitting and standing properly. If you are satisfied, tighten all the bolts, finishing your first trivet. Take a moment to admire you work, and repeat the whole process on the other three trivets.
These trivets hold up well in use, however if any of the bolts loosen, I just take a wrench to them. Usually bits of spilled enamel will fuse into the threads and prevent this. If any of the blades bend, they made be made true with a few blows of a mallet. Should the blade edges be damaged or get a lot of built up enamel on them, they can be restored with some coarse emery paper on a stick, or an alundum stone under running water.
You may find that your enameling spatula is too large to fit trivets this size. I don’t usually recommend that you cut down your spatula, but rather making one to fit your new trivets. I do this by cutting a rectangular piece of stainless sheet that will fit between the legs of the trivets, and riveting it to a stainless rod, one end of which I have flattened and bent slightly. Two rivets are enough. The other end of the rod I fix to a scrap of hardwood as a handle. If the trivet wobbles when picked up on the spatula, I first check to make sure that the spatula blade is flat, and if not I flatten it on a bench block. If the trivet still wobbles, I check to be sure that the bottom of the trivet is flat. The usual problem is that the bottom of one of the trivet blades is sticking down beyond one of the straps. This can be corrected by cutting away the excess metal with a file, so that the bottoms of all three veins of the trivet are smooth and even.
Making a Mushroom Stake from a Railroad Bolt

Silversmiths often make many of their own stakes from various scraps of metal, and found items. One of the most straight forward such projects involves making a mushroom stake from an old railroad bolt. These are not the spikes which hold the rails to the cross-ties, but rather they are the round headed bolts which secure the joining plates, that hold the end of one piece of rail to the next. The big advantage to these over other large bolts is that the head is already very nearly the right shape.
If you know someone who works for the railways, you may be able simply ask for a few bolts. If not you will have to go for a bit of a walk. Bolts are not as common to find along the tracks as are spikes, but if you know where to look you can find them. Never attempt to unbolt the rails! This is not only dangerous and illegal, but will likely prove to be fruitless, as the nuts tend to be quite rusted in place. The railroad crews use powerful pneumatic wrenches, and still often have to simply cut the bolts off. Look for a rural track that has been recently repaired. Piles of rotten ties at crossings are an indication that repairs have been done. What I do is this: I walk down the track, along one rail going out and along the other coming back, and kick the joining plates as I pass them. If the bolts are loose, this indicates that the joint has not been repaired, and so I keep walking. If on the other hand, the plates and bolts are tight, or the bolts look new, then I look all around the side of the track, in both the ditches and on the bedding rock. Sometimes I will not be able to find anything, but more often I can. Some of the bolts will be cut off with a torch, and so the nut will have been destroyed, but when I find complete bolts, then I also look for the big square nuts they thread into. These are harder to find, but they are there. On some tracks I have found no bolts at all, while on some there have been many. If there are no signs of major track repairs, then I tend to look where the rails go around corners, where there is relatively more stress on the rails.
Caution! Trains are big, fast and dangerous; I once saw one smash a large log loader to bits. Rail yards sidings and other railway facilities are often marked Privet Property. If you go in they could bust you, and the railroad bulls can be nastier than the local cops. Even on a seldom used rural line be alert. If repairs have been made they may be planning to run more trains soon. Never go out onto a bridge, into a tunnel, or a cut from which there is no obvious and immediate escape. I once had to climb a cliff to get out of the way of a train. If you feel any vibration in the ground, or hear whistles or any train sound, get well clear of the tracks.
Once you have some bolts you can shape the heads without a great deal of trouble. If you want a round domed stake, then the bolt will already be nearly the proper shape. You can do all the shaping and finishing by hand, with files and emery cloth, but I find power tools to be very helpful. You can use all manner of power grinding equipment, including angle grinders, lapidary gear and auto-body tools, but what I find the simplest is an 80 grit flap wheel, followed by a medium unitized deburring wheel. These are basically like a very dense and aggressive Scotchbrite wheel, and you can get them at most industrial supply places, and on line. They cut through the scratches left by 80 or 100 grit sanding, and leave a smooth satin finish. I don’t often need a smoother finish on my stakes, but when I do, I just follow the deburring wheel with a hard felt wheel, with a polishing compound for steel, such as Zam or White Diamond. In addition to making round dome topped stakes, I will often grind some of the bolts to an oval dome, or a rounded cone with a belt grinder or bench grinder before finishing.

When I find bolts that have been cut off with a torch, I will heat them in a forge, and hammer the shank to a tapered square section, that can be driven into a stump, set into a vise, or mounted in a stake holder. If you have any blacksmithing experience this should be very straight forward. If the bolt is full length but the threads have been damaged or worn away, then I will usually grind the shank on a bench grinder to fit a standard stake holder. If the threads are complete I often leave them there, and make a holding jig from one of the big square nuts. Making this holder is quite simple. I cut a rectangular plat of steel, grind the edges smooth, and drill the corners to accept lag bolts. After beveling the edges of the nut I weld it diagonally to the plate, using plenty of filler rod. This is best done with an arc welder, but I have had good success gas welding these. The holder can be bolted to a forming stump, or a stake horse, or even a solid work bench. With the holder bolted down, you can attach any shape of stake you have made from a railroad bolt.

Making the Two Foot Stake Horse
One of the most useful things a metalsmith can have is a low sturdy platform on which tools may be secured. This need not be anything elaborate, nor in most cases overly massive. With a few common tools you can build just such a platform with a modest amount of materials. On this you can mount bench vises, stake holders, flat anvils and any of the various wedge shaped mounting systems that are available for the jewelry trade.
Materials: For this project you will need two 8′ 2x4s, one 4′ 4×6, about half a pound of nails that are between 2 ½ and 3 inches long, and four lag bolts that are around 3 inches long. You will need other bolts to secure whatever vises or other hardware are to be attached, and these should be sized as appropriate to the bolt holes on such hardware. If you wish to secure a baton to one or another side to hold hammers, a two foot piece of lath or the wooden stake from a political sign will do well.
Tools: The tools for this project are not exotic, and are the sort of thing that many people already have, so if there is one or more you lack I would advise asking friends for the loan of tools, rather than buying. You will need a circular saw with a full two inch depth, or a sharp handsaw and quite a bit more time. Sawhorses are not absolutely required, but if you have trouble crouching or working kneeling, they are a good idea. You will also need an electric drill or bit and brace; as with the saw, electricity is not essential, but makes things go faster. The size of drill bits you will need will depend on the diameter of the lag bolts. For layout you need a pencil, and a carpenter’s square, and for assembly you will need a hammer, a wood chisel and a wrench that fits the bolts.
Getting Started: Make sure you have a workspace with good light, ventilation, and a smooth level floor. If the weather is fair, this can be a patio, porch or other outdoor concrete pad. If you have saw horses set them up so that you can comfortably maneuver your 8′ lumber on them. If extension cords are needed use medium or heavy rated, grounded cords and a grounded outlet, even if your saw or drill has an ungrounded plug. This is because of the danger of accidentally cutting through the cord and becoming the pathway to ground yourself.
Layout and Cutting: With the square mark cuts on one of the 2x4s and on the 4×6 at two foot intervals, as evenly and squarely as you can. Remember to mark both sides of your 4×6, as you will need to cut from both sides. These will form the back and legs of your stake horse. Next, with the saw unplugged, set the depth for 1 ½”, without changing the cut angle. This will be the thickness of your 2×4 braces that will keep your horse rigid. On one of your pieces of 4×6 mark square across the narrow sides at 3 ½” form each end, which is the width of the legs. Make similar marks on one end of each leg, but remember that these are not cutting lines, and only a aid to assembly. From the bottom end of these lines mark diagonal cut lines from what will be the bottom edge of 4×6 at a 45 degree angle running up toward the center. Now mark another line 3 ½” from each diagonal; I usually just use one of the legs as a guide. Refer to the provided diagram,and be sure to mark both sides of the 4×6. With the saw set for 1 ½” saw these cut lines, and then saw stop-cuts at roughly ¼” intervals between them. With your wood chisel cut out the channels that will take your bracing.
Beginning the Assembly: With nails fasten the legs to the lower piece of 4×6, which you have just cut, using the lines you first struck as guides. It is important that the legs be fastened accurately, so use the square to align them, and drive only one nail at first. When all the legs have been secured with three or four nails, mark 45 degree cut marks across the ends of your other 2×4, and trim the ends. Take each end and fit it into one of the channels you have cut in the 4×6. A little corner will stick up beyond the edge, and this is to be marked with the pencil , as is the line where the 2×4 sticks out beyond the leg. These lines then get cut to produce two of the braces. These get secured in their channels and to the legs with nails, and the process is repeated on the other side to make that side’s braces. Now the other piece of 4×6 is places on top of the one you just braced, with then ends flush and between the protruding tops of the legs. Drive nails through the tops of the legs to secure the 4×6 top of your horse. With what remains of you last 2×4 cut two crossbars, that will act as feet, at 45 degree angles and trimmed ends similar to the braces, and as shown on the diagram. While you have your saw out cut your baton to two feet in length, and with luck that will conclude your work with the saw.
Drilling and Bolting: You will want two different sized drill bits, one that is the diameter of the bolts, and one that is a little smaller so that the thread will have plenty of wood to grip. On each of the feet mark two drilling points an inch to an inch and a half from the top edge, and centered on the legs. With the larger bit, drill all the way through as squarely as possible. Now set your horse upright on the smooth floor and check for wobble. If the horse wobbles, use your square to check it against the floor, and determine which leg must be trimmed. Once your horse stands flat on the floor, place the feet against the legs with bolts in the holes. Tap each bolt to mark the placement of the next holes. With the smaller bit drill holes into the edge of the legs, deep enough to accept the bolts. Now screw the bolts into place with your wrench, securing the feet. Now mark the bolt hole locations for the top by placing the vice, stake holder, or whatever you are to bolt on with a marker. Drill these as squarely as you can with the proper sized bit and to the depth appropriate to the bolts you will use. Bolt down your hardware, and nail the baton in place. If done right this project should leave very little scrap, and the cleanup should mostly involve putting away or returning tools, and sweeping up the sawdust.

Thanks so much for all the great tips and how toos!
LikeLike
excellent, I love the ideas and can make good use of them.
LikeLike
Thank you, Bill! Obviously a draftsman at heart! I’m definitely going to share your post with my metalsmithing and enameling friends!
LikeLike
3 brief notes-
All railroad property in the US is protected and gathering even obviously discarded items is against Federal law. Sole exception is an abandoned private siding formerly used by a factory, which is where I found mine.
Both bolts and most RR spikes are medium carbon steel and are hardenable, I use water and only cool the head, leaving shafts softer, less maintenance needed on hardened stakes.
With larger pieces of thin stainless sheet and decent shear skills you can make trivets easily just by cutting and bending. Cheap/free thin stainless sheets are available at scrapyards abd kitchen counter fabrication shops, the sheet they use is very useful. Develop a pattern with thin cardboard first.
Enjoy
LikeLike
I’ve made two trivets now and also a spatula for them. Thanks for a great DIY project!
LikeLike
Thank you. You’ve given me excellent instructions. We, as a species, WILL go much further if we share things to help our species to grow and not decline through ignorance of reality.
LikeLike
Thanks a lot. Your instructions came just at the right time. I needed them in my workshop.
LikeLike